
Make a Simple Custom Weapon
This is a complete beginner walkthrough. You will make one plain brown stick in Blender and use it to replace the normal Shovel model in Minecraft Dungeons II. You will also make a matching inventory icon and two simple game textures. The Shovel keeps its existing name, stats, attacks, sounds and effects.
Community credit: This is all possible thanks to the people at Dokucraft. Join the Dokucraft Discord.
Why use the Shovel? It is a single static mesh and is a good first replacement. The original mesh is used only as a size, direction and pivot reference. You do not need to modify animations, sounds, blueprints or localisation.
What You Will Do
- Install the required programs.
- Configure FModel for Dungeons II.
- Export
SM_Shovelas a reference. - Make one stick in Blender.
- Export the stick as FBX.
- Configure the Dungeons II Mod Kit.
- Make the textures and icon, then complete all Unreal Engine work in one pass.
- Run the asset extractor and patch the original material as the final preparation step.
- Cook and package the mod.
- Load the game, equip the weapon and test it.
1Download the Programs
- Dungeons II Mod Kit
Provides the Unreal project and the scripts that cook and package the mod.
DownloadJump to setup - Unreal Engine 5.6.1
Imports the FBX and creates the cooked game assets. Use 5.6.1, not a newer engine version.
DownloadJump to import - FModel
Opens the installed game archives and exports the original Shovel mesh.
DownloadJump to setup - Minecraft Dungeons II Mapping 1.1.1
Required to read the game's unversioned assets in FModel and UAssetGUI. This file does not come with the game, FModel, UAssetGUI or the Mod Kit, and generating it yourself is an advanced process. This download is for game version1.1.1only.
Download mapping 1.1.1Jump to FModel setup - Dungeons II Asset Extractor
A batch helper that uses reTOC to convert only the game packages you request into editable.uasset/.uexpfiles. It asks for every input and the output folder.
Download BATJump to asset extraction
Download reTOC - UAssetGUI
Changes the original Shovel material's built-in brightness from0.25to1.0. This is required for this tested Shovel method and is not a repair for a Blender mistake.
DownloadJump to brightness adjustment - Blender
Creates, positions and exports the replacement stick.
DownloadJump to modelling - Unreal PSK/PSA for Blender
Adds support for the.psk/.pskxmodel exported by FModel.
Extension pageJump to installation
Source and releases - Paint.NET
Creates the game textures and transparent inventory icon. Another editor that can save transparent PNG files is also suitable.
DownloadJump to textures
Use your own installed game files. This page does not provide game assets, a mapping file or an AES key.
Install Unreal Engine 5.6.1
- Install and open Epic Games Launcher.
- Open Unreal Engine > Library.
- Click the plus button beside Engine Versions.
- Choose version 5.6.1 and click Install.
- Do not use 5.5, 5.7 or another release for this Mod Kit. Unreal assets are version-sensitive.
Install the Blender PSK/PSA extension
- Open Blender.
- Open Edit > Preferences > Get Extensions.
- Search for
PSK PSA. - Install Import-Export: Unreal PSK/PSA.
- If it is not offered in Get Extensions, download the ZIP from the extension source link, then use Edit > Preferences > Add-ons > Install from Disk and choose that ZIP.
- Restart Blender. File > Import should now include an Unreal PSK option.
2Configure FModel
- Open FModel.
- Open Directory > Selector.
- If Minecraft Dungeons II is not listed, expand Add Undetected Game.
- Name it
Minecraft Dungeons II. - Select the game's
Paksfolder. It is the folder that containsglobal.utocandDungeons-WinGDK.utoc. - Xbox installs normally use:
...\Minecraft Dungeons II\Content\Dungeons\Content\Paks - Steam installs normally use:
...\Minecraft Dungeons II\Dungeons\Content\Paks - Add the game, select it, set the game version to
GAME_UE5_6, then click OK.
Mapping file and encrypted archives
The mapping is required and is not included with any of the programs. If your game is version
1.1.1, download Dungeons-II-Mapping-1.1.1.usmap before continuing. A different game version needs its own matching mapping.- Open Settings in FModel.
- Confirm UE Versions is set to
GAME_UE5_6. - Enable Local Mapping File and select the correct Dungeons II
.usmapfile for your installed game version. - Open the Models or Exports section of Settings. Set Mesh Format to ActorX (.psk/.pskx).
- Set the output directory to a folder you can find, then save Settings.
- If the archives show as encrypted or disabled, open Directory > AES and enter the correct AES key for your legally owned game/version.
AES warning: the AES key is version-specific and is not included here. Do not post it on the website, in screenshots or inside a released mod. A missing or incorrect key prevents FModel from loading encrypted archives; it is not fixed by reinstalling Blender or Unreal Engine.
Mapping warning: a mapping made for a different game update can produce missing properties, failed previews or incorrect exports. Update the mapping when the game updates.
Need the mapping for game version 1.1.1? Download
Dungeons-II-Mapping-1.1.1.usmap. Use this file only with Minecraft Dungeons II version 1.1.1.3Find and Export the Shovel
- In FModel, open the Archives tab.
- Choose All as the loading mode and click Load.
- Open the Folders tab and navigate to:
Dungeons/Content/Spicewood/Art/Characters/Player/Equipment/Weapons - Type
Shovelinto the package search box.

Shovel. Open the Shovel result next.- Open the
Shovelfolder. - Locate
SM_Shovel. TheSM_prefix means it is the static mesh used by the weapon.
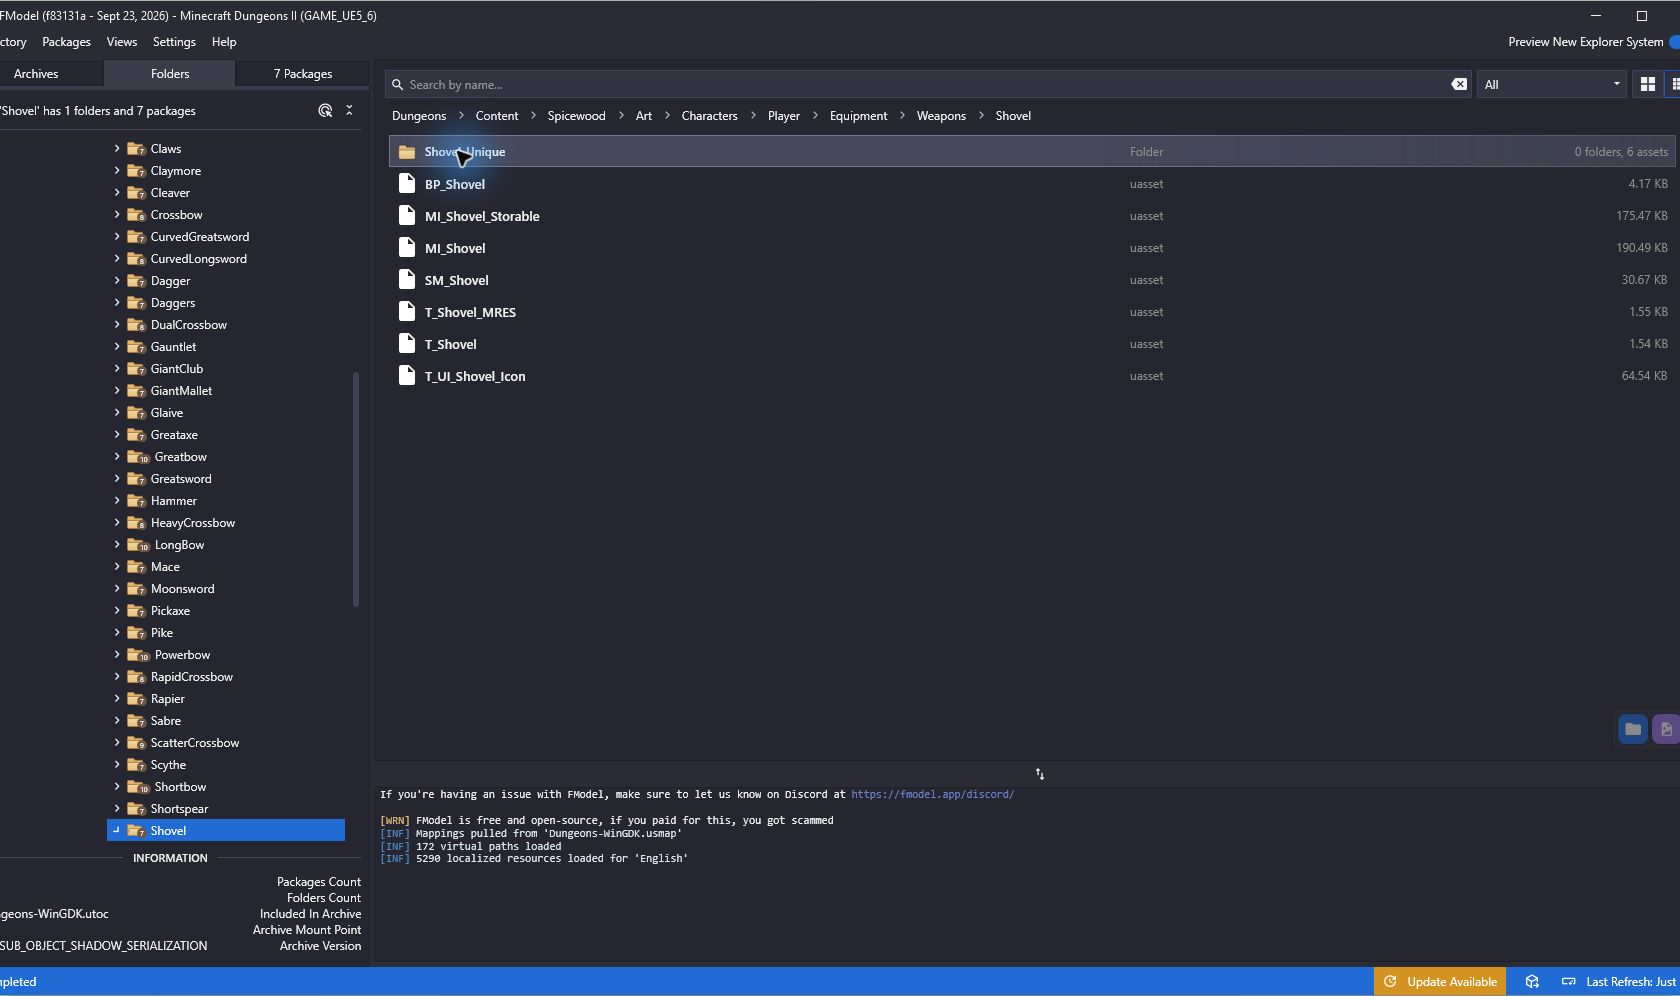
SM_Shovel. This is the model package required for the Blender reference.- Right-click
SM_Shovel. The context menu contains Raw Data, Properties and Model. Choose Model. - Do not choose Raw Data or Properties; those do not create the Blender model file. The Model command automatically uses the ActorX (.psk/.pskx) mesh format selected earlier under FModel Settings.
- If FModel opens the 3D Viewer instead of immediately saving, right-click
SM_Shovelin the viewer's outliner and choose Save Model. - Confirm the exported model is
SM_Shovel.pskxorSM_Shovel.pskinside FModel's output folder. A static mesh will commonly be saved as.pskx; the Blender PSK/PSA extension accepts both.
Why keep the original mesh? Its object origin is where the game attaches the weapon. Its direction and length show how the replacement must be built. Guessing these values is what causes floating, sideways or badly scaled weapons.
4Make the Stick in Blender
Import the reference
- Open Blender and start a new General file.
- Press A, then Delete, to remove the default cube, camera and light.
- Open File > Import > Unreal PSK (.psk/.pskx).
- Select the exported
SM_Shovel.pskorSM_Shovel.pskx. - Leave the PSK import options at their defaults and click Import.
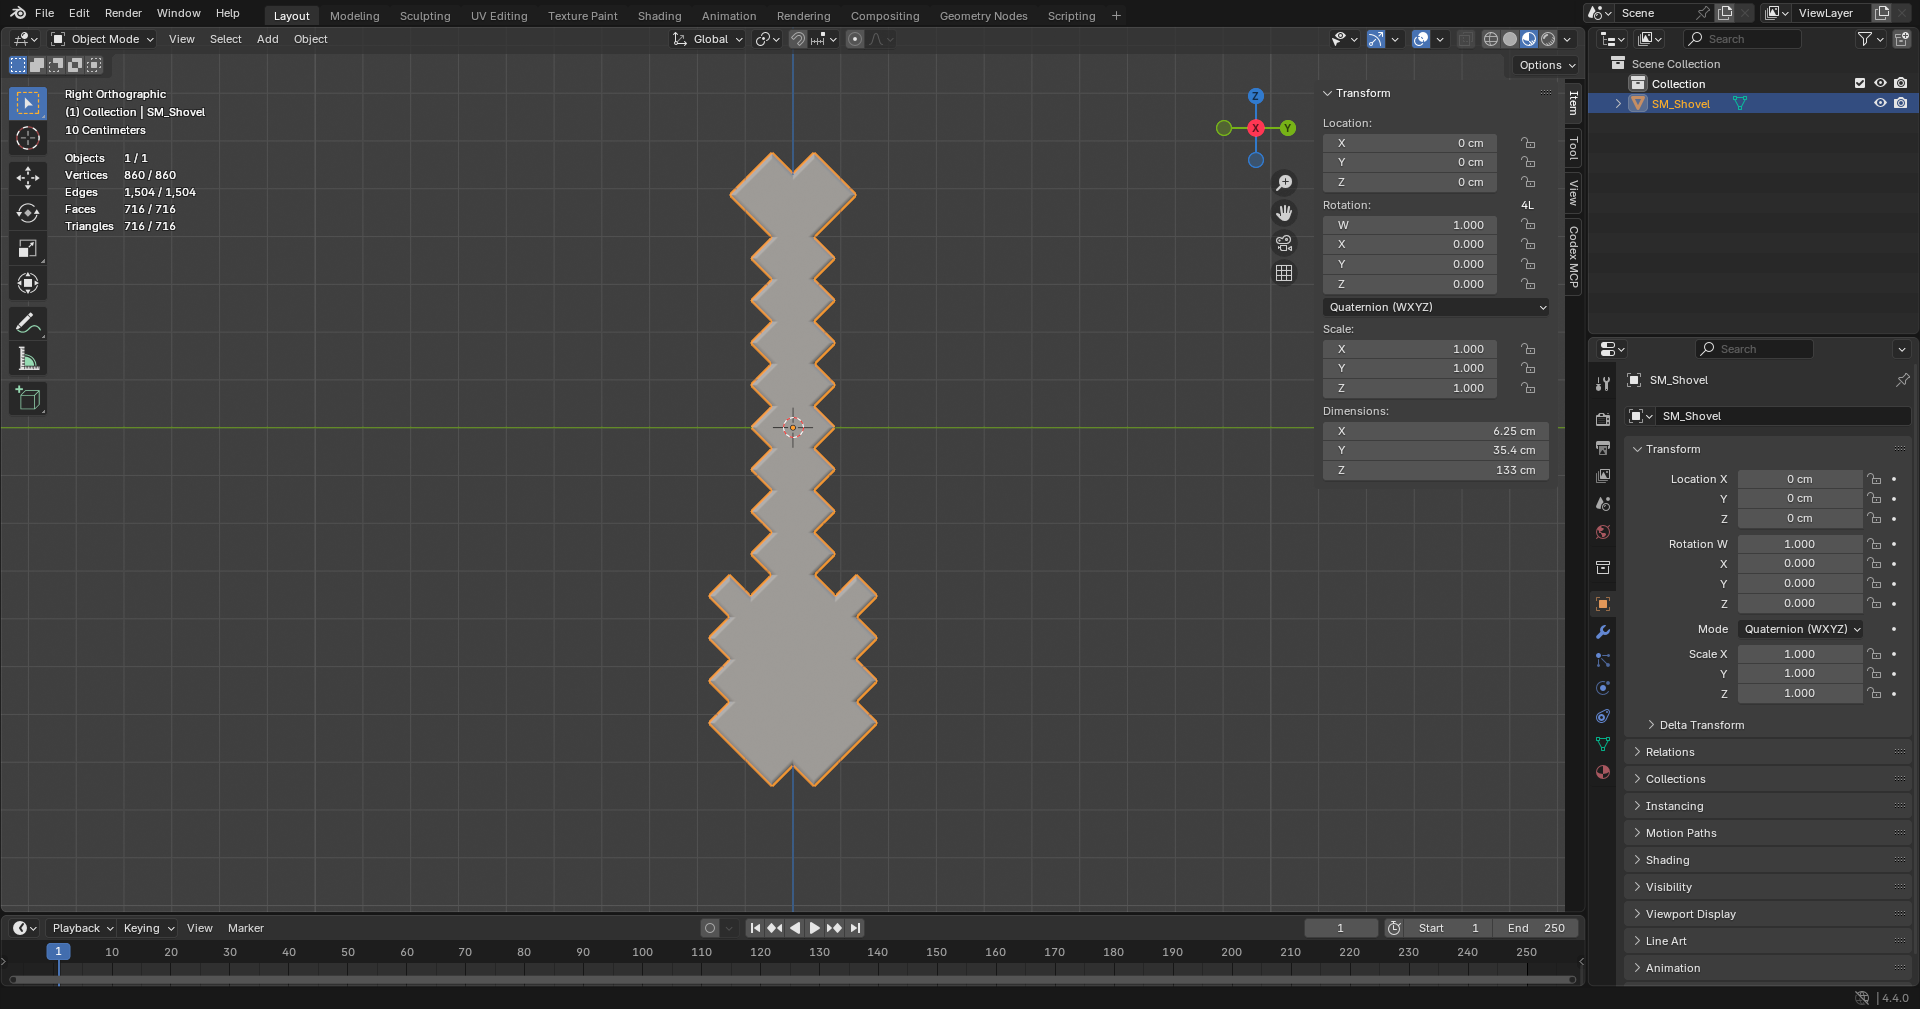
SM_Shovel, and its object Location remains 0, 0, 0.- Do not change Blender's unit scale after importing. If Scene Properties shows Metric, leave Unit Scale at
1.000. The imported Shovel is the ruler, so the workflow also remains reliable if a future importer displays centimetres differently. - Select the Shovel and press N. Under Item, its object Location should remain at
0, 0, 0. Do not move the reference object. - In the Outliner, rename the imported object from
SM_ShoveltoREFERENCE_SM_Shovel. This keeps the reference clearly separate and frees the exact game asset name for the new stick.
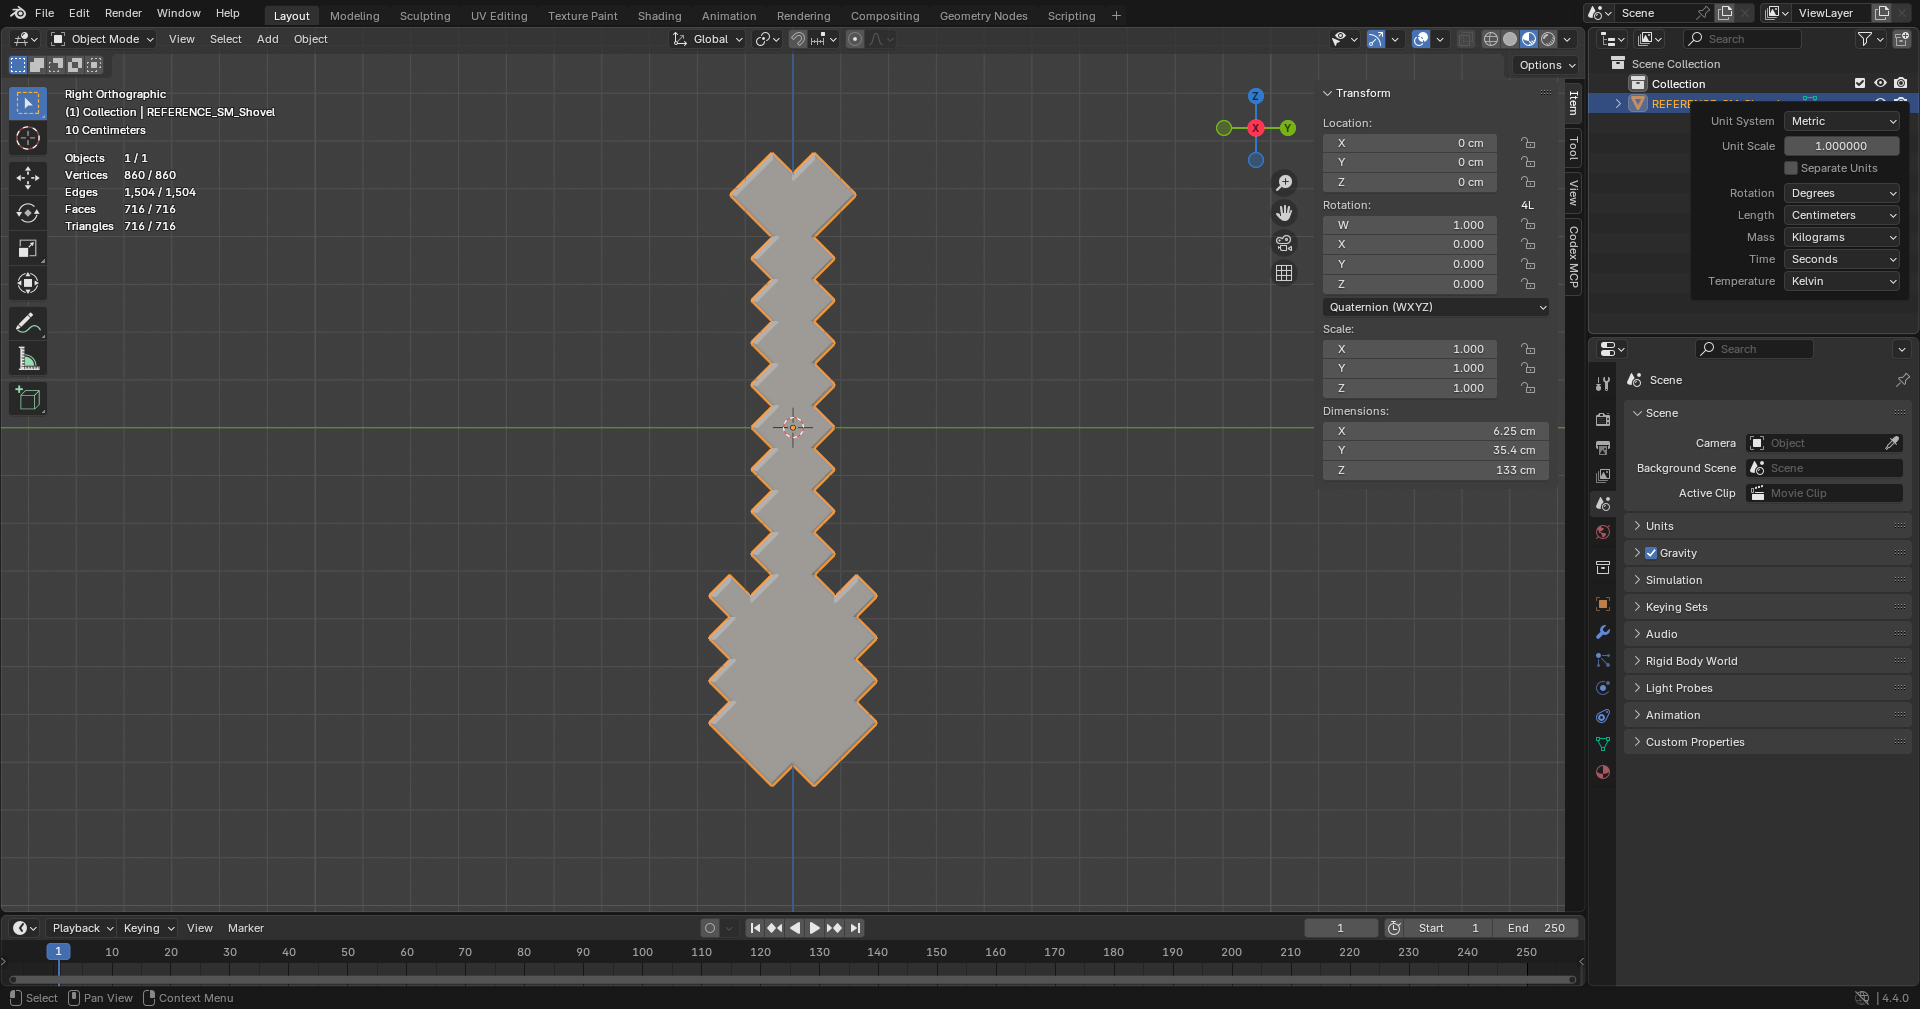
Create one cube at the Shovel origin
- With the Shovel selected, press Shift+S and choose Cursor to Selected. The 3D Cursor is now at the Shovel's object origin.
- Choose Add > Mesh > Cube. Blender adds the cube at that cursor.
- Rename the cube to
SM_Shovel. - Press Tab to enter Edit Mode.
- Press A to select all eight vertices.
- Scale the vertices into a narrow rectangular stick. Use S followed by X, Y or Z to constrain each change to one axis.
- Use G followed by an axis key to move the selected vertices until the stick covers the same usable length and direction as the reference.
- For the example shown here, the finished size is approximately
7.5 cm × 7.5 cm × 132.6 cm. Matching the imported reference is more important than typing those numbers. - Keep the bottom/handle end at the same point as the original Shovel handle.
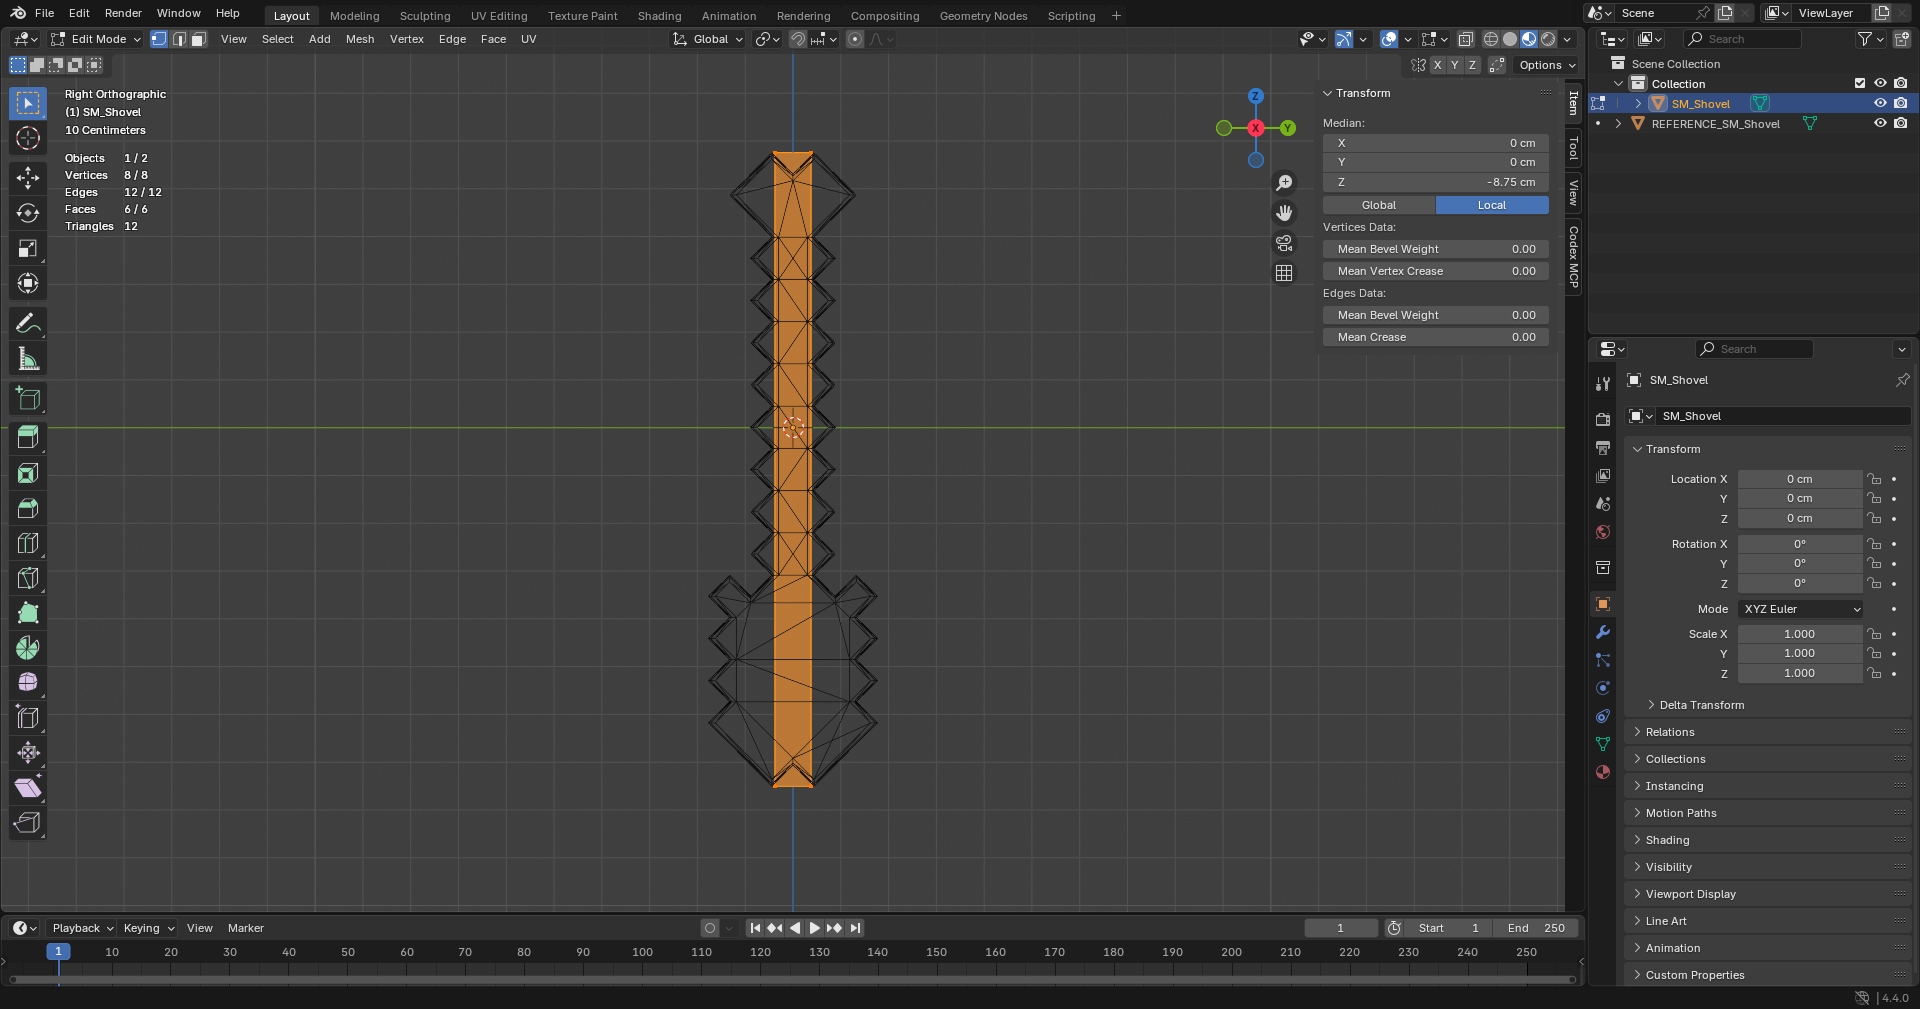
Critical rule: shape and move the vertices in Edit Mode. The object itself must stay at Location
0, 0, 0. Moving the object in Object Mode moves its attachment origin and makes the weapon float away from the hand.- Press A, then Shift+N, and choose Recalculate Outside. This corrects the face normals.
- Press Tab to return to Object Mode.
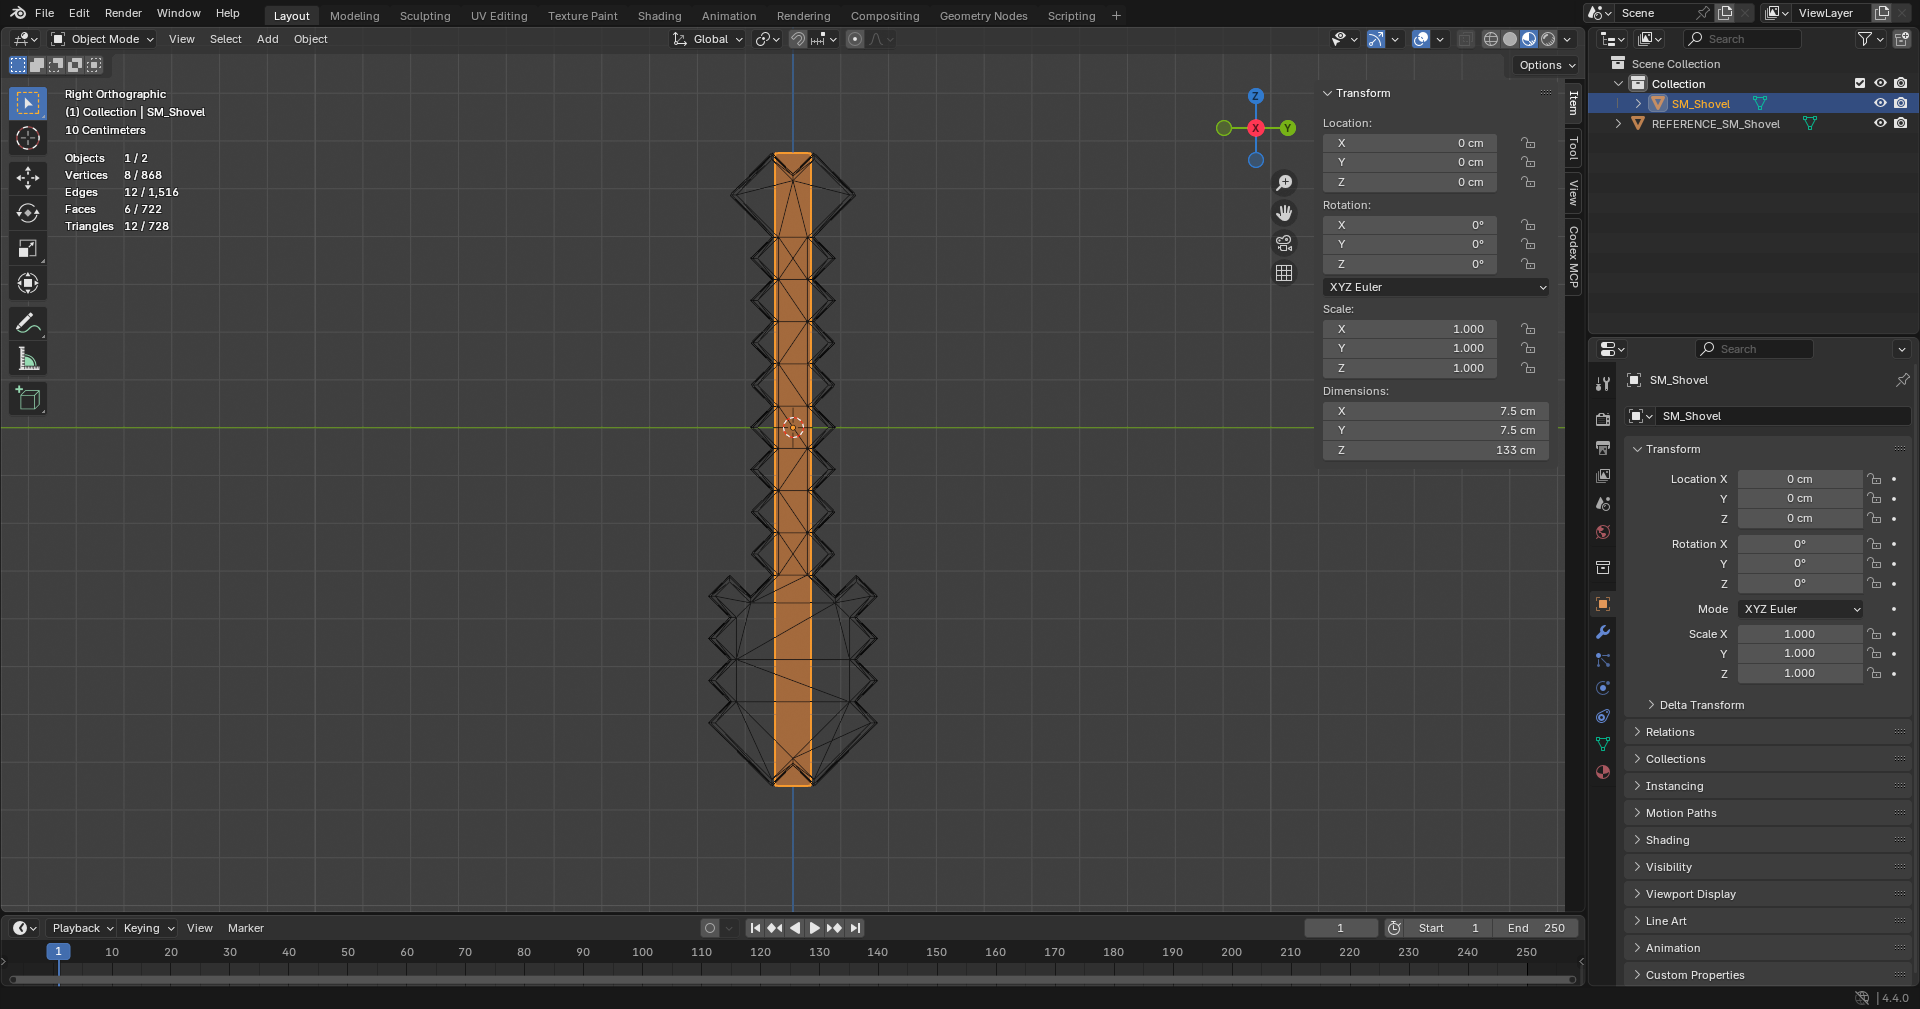
- In the Outliner, hide
REFERENCE_SM_Shovelby clicking its eye icon. You may delete it instead, but hiding it is safer until testing is complete. From this point onward, only the new stick should be visible.
Add the brown material
- With the stick selected, open Material Properties and click New.
- Name the material
M_Stick. - Set Base Color to brown.
- Set Metallic to
0.0and Roughness to about0.85. - A flat colour does not require a texture or UV map for this first example.
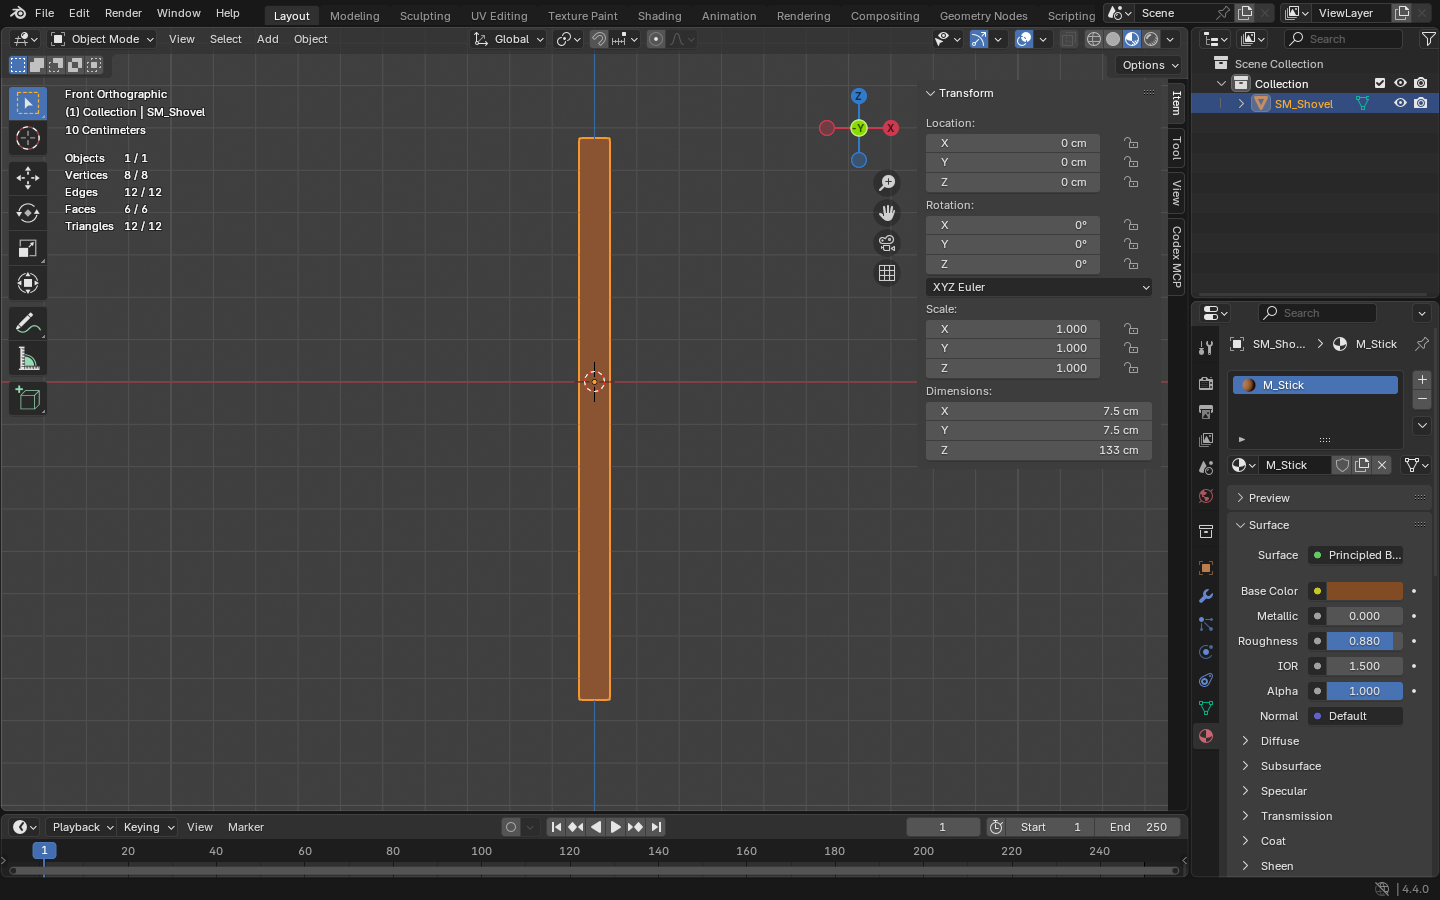
M_Stick: a brown Base Color, Metallic 0 and high Roughness. No image texture is needed for this simple weapon.Clean the model before export
- Select the stick.
- Press Ctrl+A and choose Rotation & Scale. Do not choose a command that moves the origin.
- Press N and verify Location is
0, 0, 0, Rotation is0, 0, 0, and Scale is1, 1, 1. - Save the Blender file before exporting.
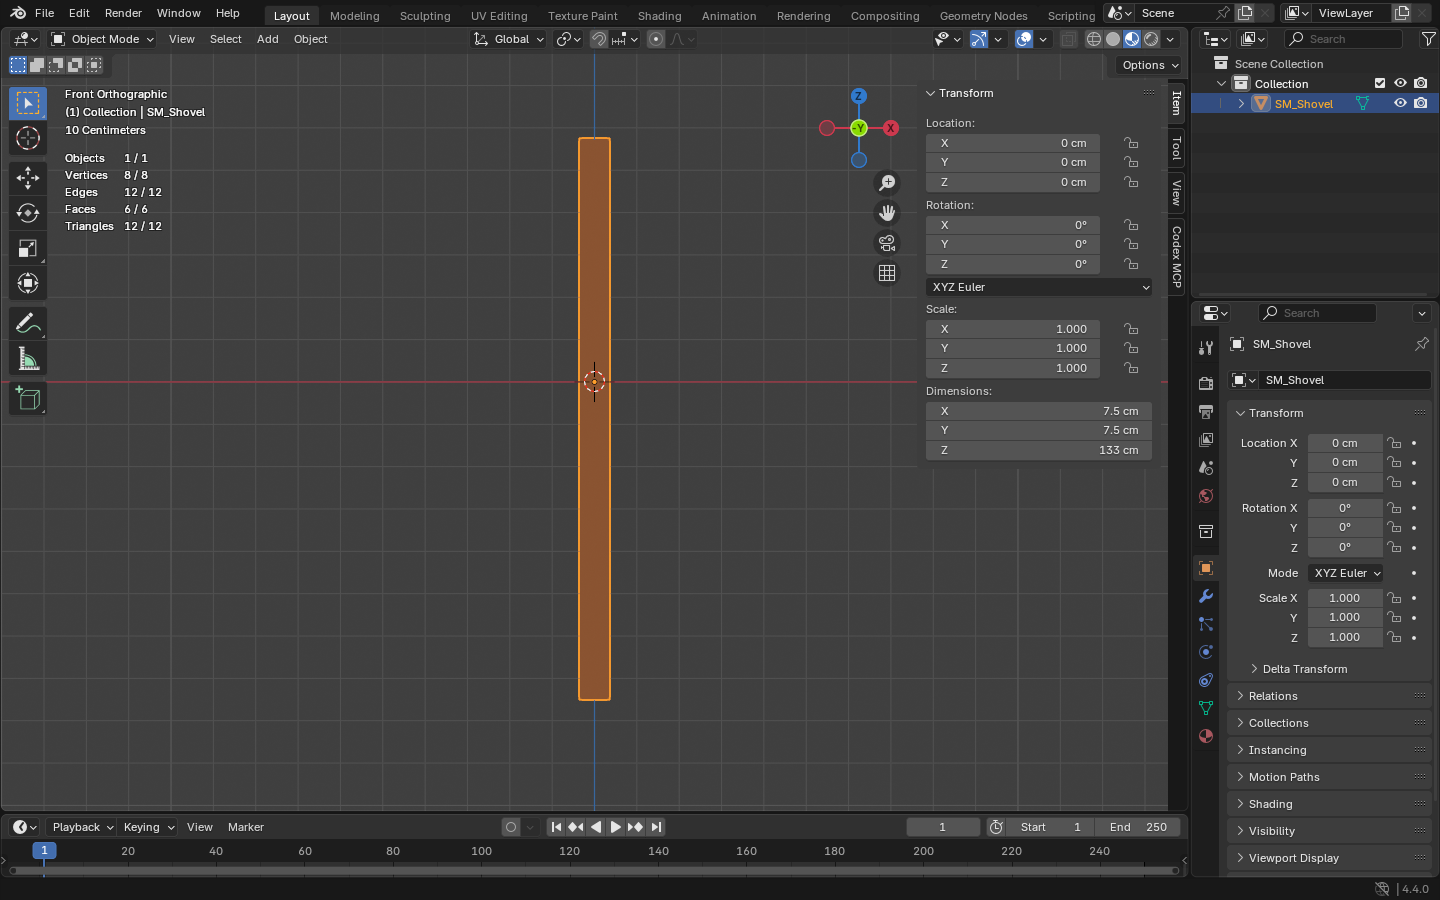
5Export the FBX from Blender
- Select only
SM_Shovel. - Open File > Export > FBX (.fbx).
- Name the file
SM_Shovel.fbx. - Use the following export settings, then click Export FBX.
Choose FBX: in Blender's Export menu click FBX (.fbx). Do not choose Stanford PLY, STL, OBJ or another format. The required FBX settings are listed below.
| Include | Selected Objects: On. Object Types: Mesh only. |
|---|---|
| Transform | Scale: 1.00. Apply Unit: On. Forward: -Y Forward. Up: Z Up. |
| Geometry | Apply Modifiers: On. Smoothing: Face. |
| Armature | Not used. This is a static mesh. |
| Bake Animation | Off. |
6Configure the Dungeons II Mod Kit
- Extract a fresh copy of the Dungeons II Mod Kit into its own folder. The downloaded ZIP normally extracts as
Dungeons-II-Mod-Kit-main. Keep each mod in its own Mod Kit copy. - Every Mod Kit path in this guide starts with
Dungeons-II-Mod-Kit-main. If you renamed that folder, use your folder's name in its place. - Open
Dungeons-II-Mod-Kit-main\Settings. - Open
Dungeons-II-Mod-Kit-main\Settings\editor_directory.txt. Put the full path to Unreal Engine 5.6.1'sEngine\Binaries\Win64folder on its own line. - Open
Dungeons-II-Mod-Kit-main\Settings\game_directory.txt. Put the Minecraft Dungeons II install folder on its own line. Use the folder containing the game'sDungeonsorContentfolder, not thePaksfolder. - Open
Dungeons-II-Mod-Kit-main\Settings\mod_info.jsonand fill in a unique id, name, version and author. Keep the id simple and do not use it for another installed mod. - Open
Dungeons-II-Mod-Kit-main\copy_cooked_assets.rcj. - Delete the filter line
M_*.u*. If this line remains,M_Stickis cooked but omitted from the final mod. - Leave the
MI_*.u*filter in place. This prevents Unreal's temporary material-instance placeholder from replacing the game's compiled material. - Leave
/XFin the file because the remaining shader and asset-information filters still use it. - Create
Dungeons-II-Mod-Kit-main\Precookedif it does not already exist. The original compiled material will go here.
Example settings
Dungeons-II-Mod-Kit-main\Settings\editor_directory.txt | <YOUR UE 5.6.1 FOLDER>\Engine\Binaries\Win64Use the folder on your own computer. Do not copy another person's path. |
|---|---|
Dungeons-II-Mod-Kit-main\Settings\game_directory.txt | <YOUR MINECRAFT DUNGEONS II FOLDER>Use the install folder selected by your own Steam, Minecraft Launcher or Xbox app. |
Dungeons-II-Mod-Kit-main\Settings\mod_info.json | Example id: Stick-Shovel-TutorialExample name: Stick Shovel Tutorial |
7Prepare the Textures and Complete the Unreal Import
Make the two replacement game textures
- Open Paint.NET and make a
64 x 64image filled with one brown colour. This example uses RGBA126, 68, 27, 255. - Save it as
T_Shovel.png. - Make a second
64 x 64image filled with RGBA0, 220, 0, 128. This supplies uniform non-metallic, rough, non-emissive packed material data. - Save the second image as
T_Shovel_MRES.png. - Create this exact folder path:
Dungeons-II-Mod-Kit-main\Textures\Spicewood\Art\Characters\Player\Equipment\Weapons\Shovel - Put both PNG files in that final
Shovelfolder. Do not drag them into Unreal.Dungeons-II-Mod-Kit-main\cook_assets.batimports them using the original game's texture settings.

T_Shovel.png: the solid brown base colour.
T_Shovel_MRES.png: uniform packed material values for rough, non-metallic wood.Make the replacement inventory icon
- Open Paint.NET and create a
256 x 256image with a transparent background. - Draw a simple brown stick from the lower-left towards the upper-right. Leave clear transparent space around it so it fits inside the inventory tile.
- Save it as a transparent PNG named exactly
T_UI_Shovel_Icon.png. - Create this exact folder path:
Dungeons-II-Mod-Kit-main\Textures\Spicewood\Art\Characters\Player\Equipment\Weapons\Shovel - Put
T_UI_Shovel_Icon.pngin that finalShovelfolder. Do not drag this PNG into the Unreal Content Browser. The Mod Kit imports it duringDungeons-II-Mod-Kit-main\cook_assets.batand copies the original Shovel icon's texture settings.
Open Unreal Engine and import the model
New to Unreal Engine? The asset panel is called the Content Drawer while it is closed or floating, and the Content Browser when it is docked. They are the same thing. The button is at the bottom-left of the editor. Press
Ctrl+Space if you cannot see or open it.- Open
Dungeons-II-Mod-Kit-main\UE5Project. - Double-click
Dungeons-II-Mod-Kit-main\UE5Project\Dungeons.uprojectand open it with Unreal Engine 5.6.1. - Wait until the Unreal Editor has fully opened. Find Content Drawer at the bottom-left and click it. The panel that opens across the bottom is where Unreal stores project assets.
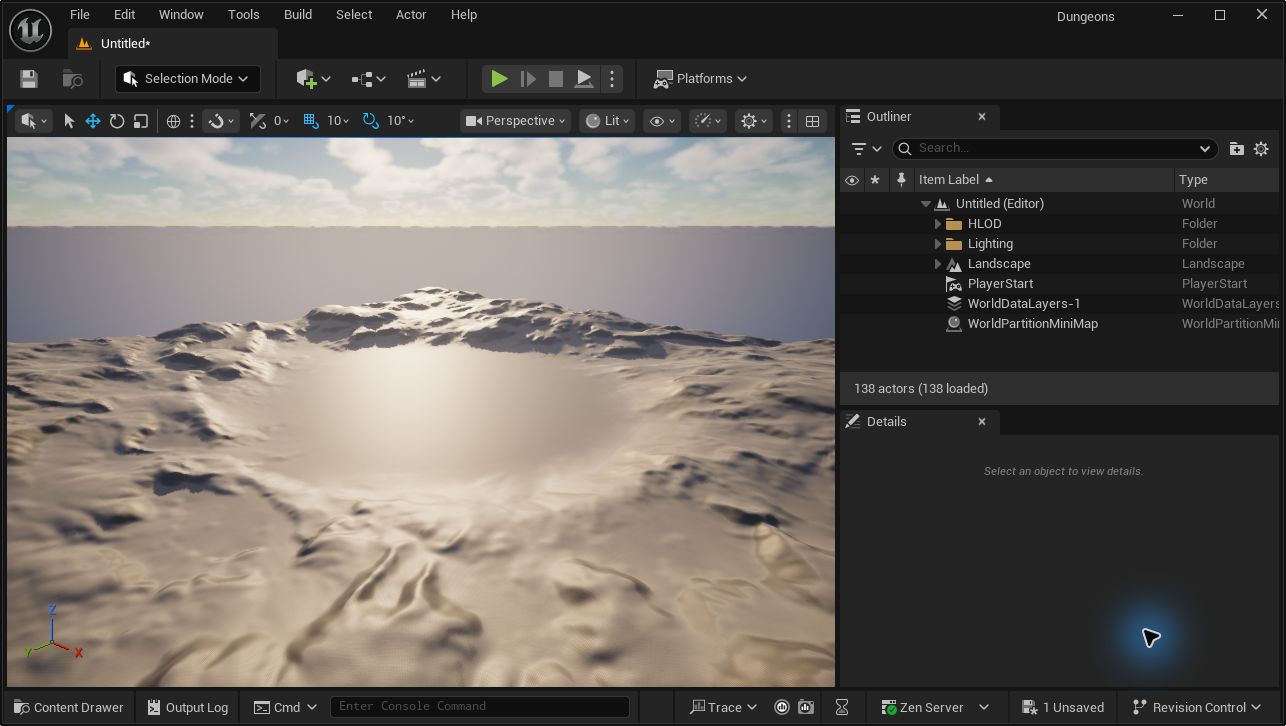
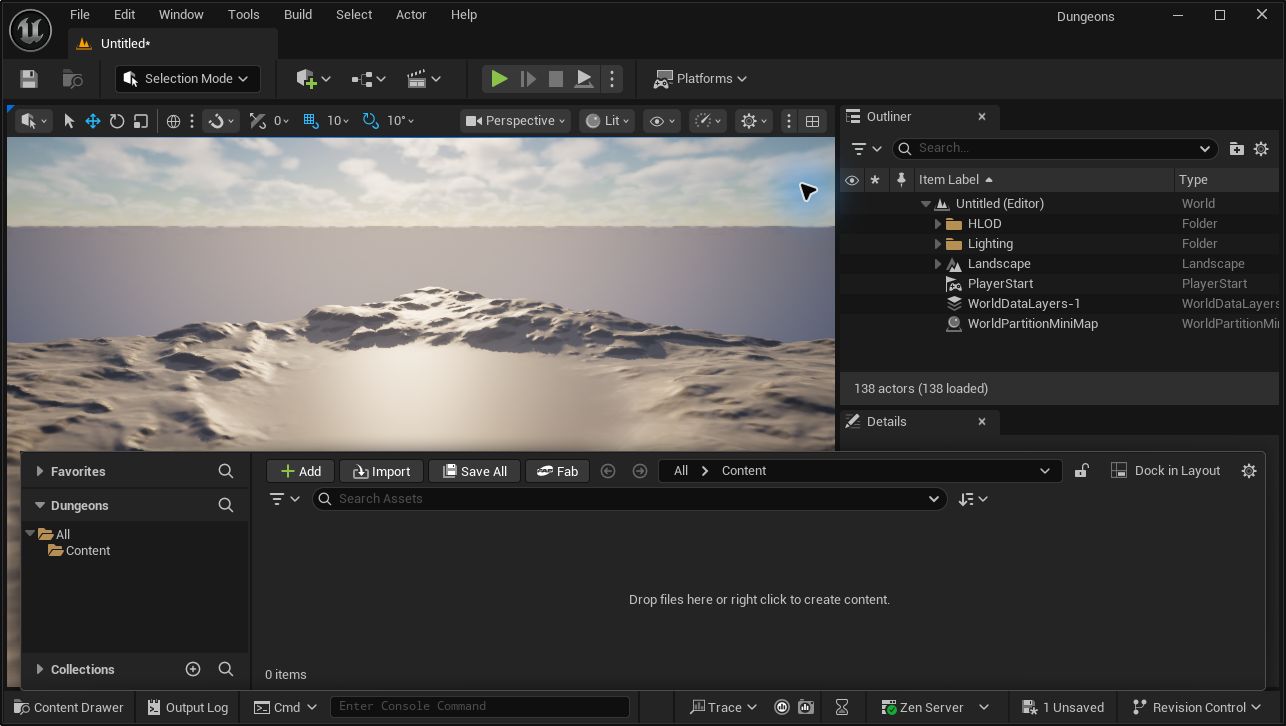
Ctrl+Space, to open the asset panel. Content appears in the folder tree on the left.Create the exact game folder path
- In the folder tree on the left, click Content. Unreal displays the virtual game root
/Gameas Content. Do not create another folder named Content inside it. - Right-click Content and click New Folder.
- Type
Spicewoodand pressEnter. - Right-click the new
Spicewoodfolder, click New Folder, typeArt, and pressEnter. - Repeat the same action inside each new folder to create, in this order:
Characters,Player,Equipment,Weapons, thenShovel. - Click the final
Shovelfolder. The breadcrumb above the asset area must read:Content > Spicewood > Art > Characters > Player > Equipment > Weapons > Shovel
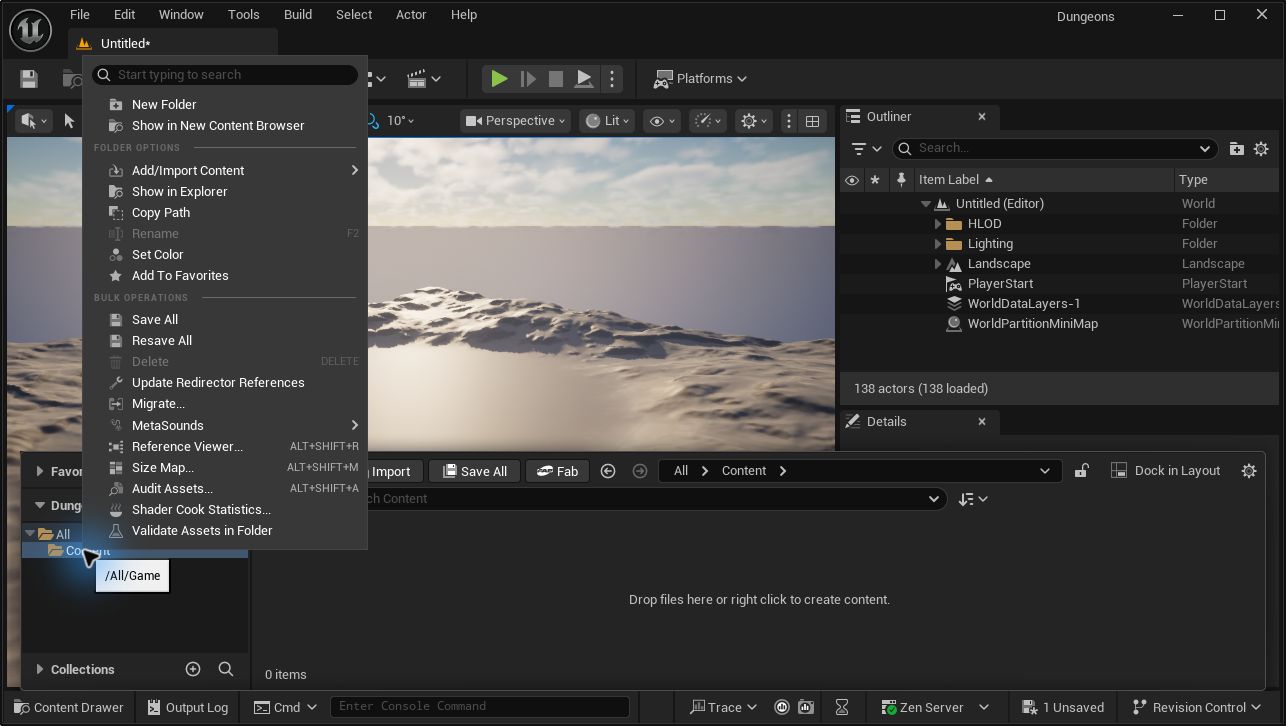
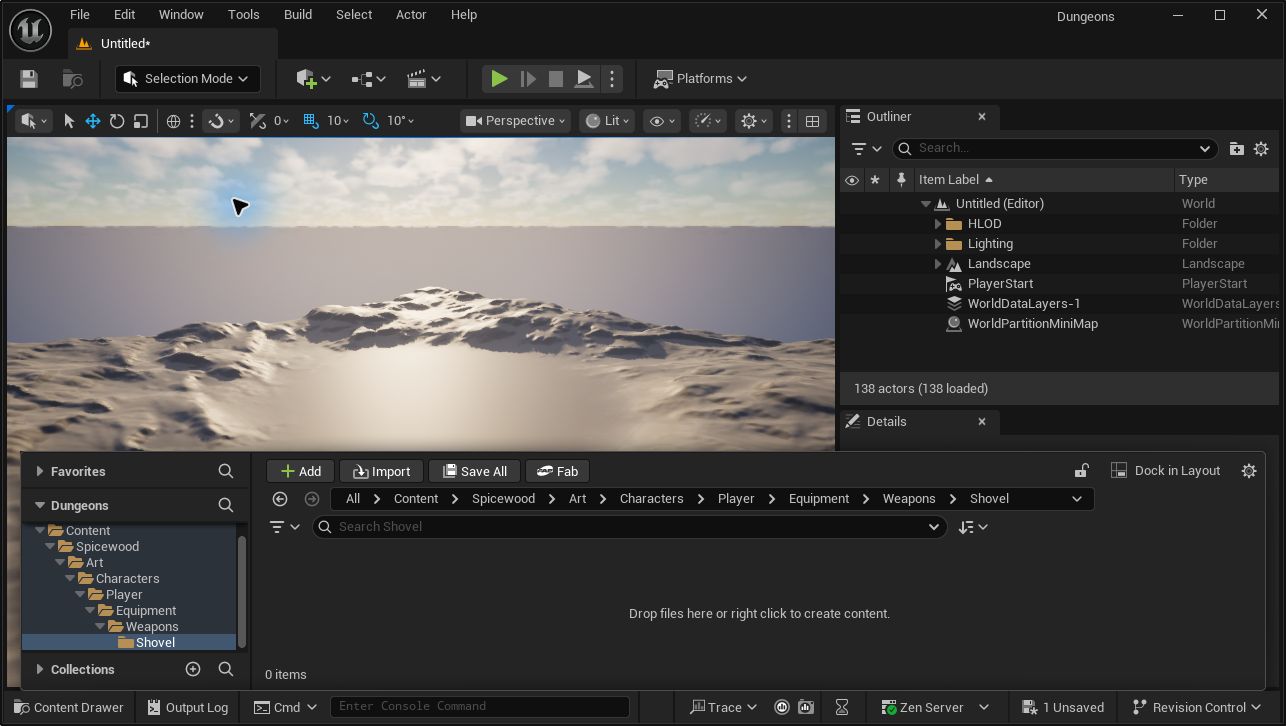
Shovel, inside Weapons.Import the FBX as a Static Mesh
- Keep the final
Shovelfolder selected. - Click the Import button at the top-left of the Content Drawer.
- In the Windows file picker, select the
SM_Shovel.fbxexported from Blender and click Open. - UE5.6 opens the Import Content window. Click the Static Meshes tab.
- Confirm Import Static Meshes is on. Leave Auto Detect Mesh Type, Import LODs and Bake Meshes on. The object is a Static Mesh, not a Skeletal Mesh, and it has no animation.
- Leave Import Uniform Scale at
1.0. Import the Blender material, but do not import or create image textures for this simple stick. - Click the blue Import button and wait for Unreal to finish preparing the mesh and shaders.

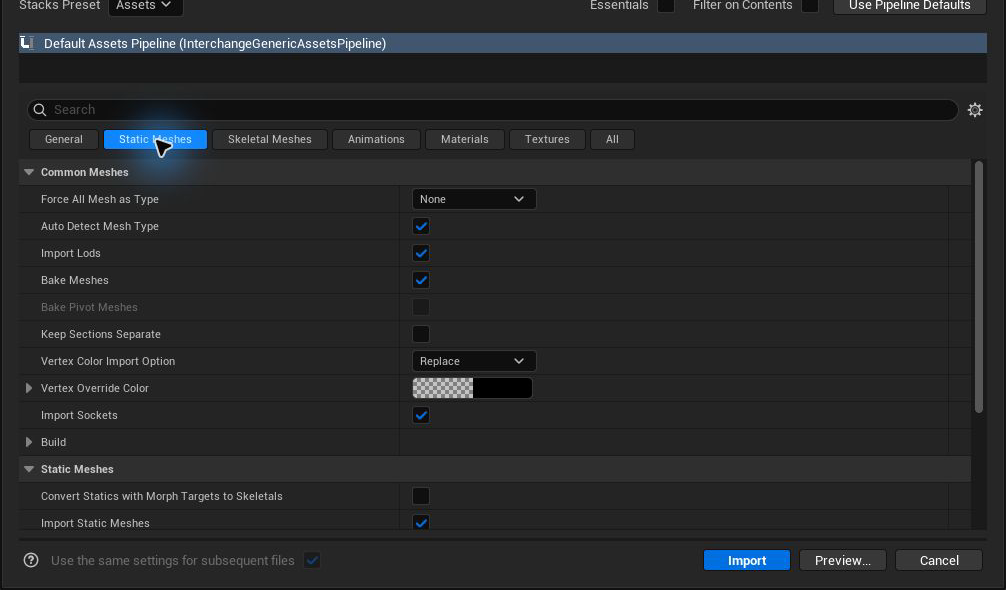
| Mesh type | Import Static Meshes: On. Do not import it as a Skeletal Mesh. |
|---|---|
| Common Meshes | Auto Detect Mesh Type: On. Import LODs: On. Bake Meshes: On. |
| Transform | Import Uniform Scale: 1.0. The Blender export already has the correct applied transform. |
| Materials | Import the material so Unreal creates M_Stick. Do not import image textures for this plain-colour stick. |
| Animation | Not used. This replacement is a Static Mesh. |
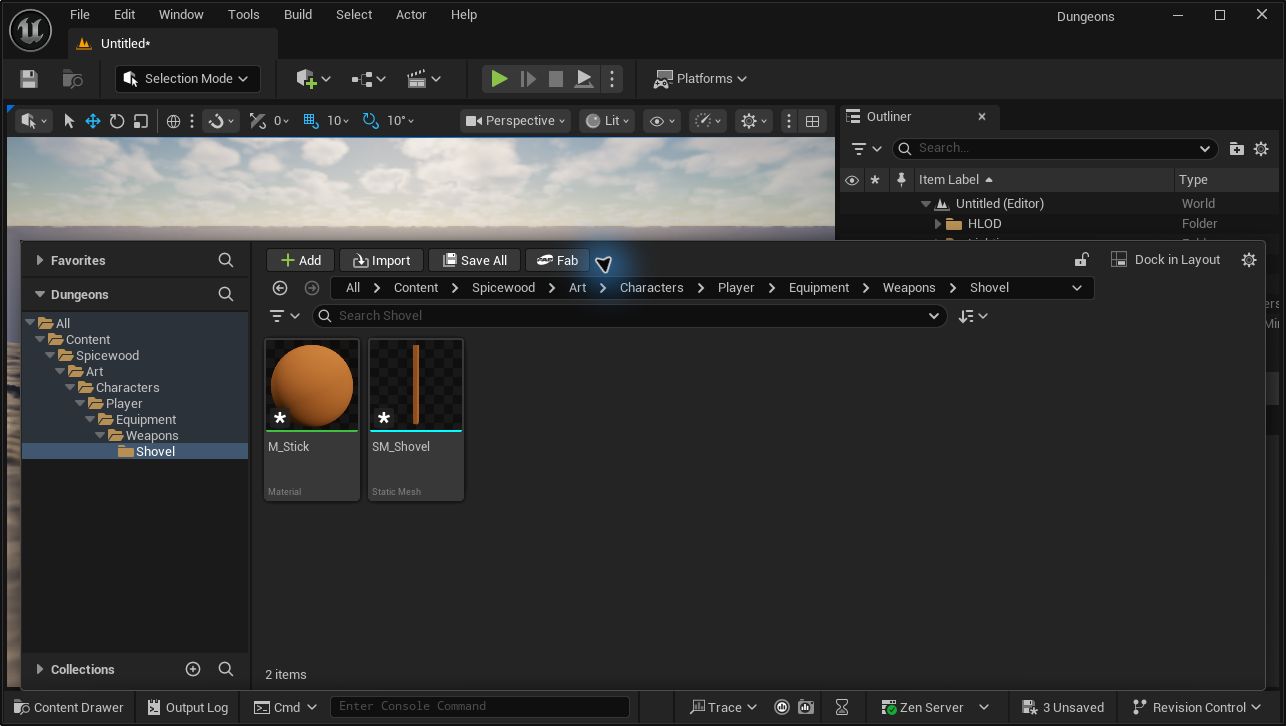
Shovel folder: material M_Stick and Static Mesh SM_Shovel.- Double-click
SM_Shovelin the Content Drawer. - The Static Mesh Editor opens in a separate window. Confirm the brown stick is visible and the top-left tab says
SM_Shovel. - In the right-hand Details panel, confirm Material Slots > Element 0 currently uses
M_Stick. A later step replaces this with the temporaryMI_Shovelcooking placeholder. - Click the Save icon at the top-left of the Static Mesh Editor. Return to the main Unreal window and click Save All in the Content Drawer. The unsaved-asset count at the bottom-right should clear.
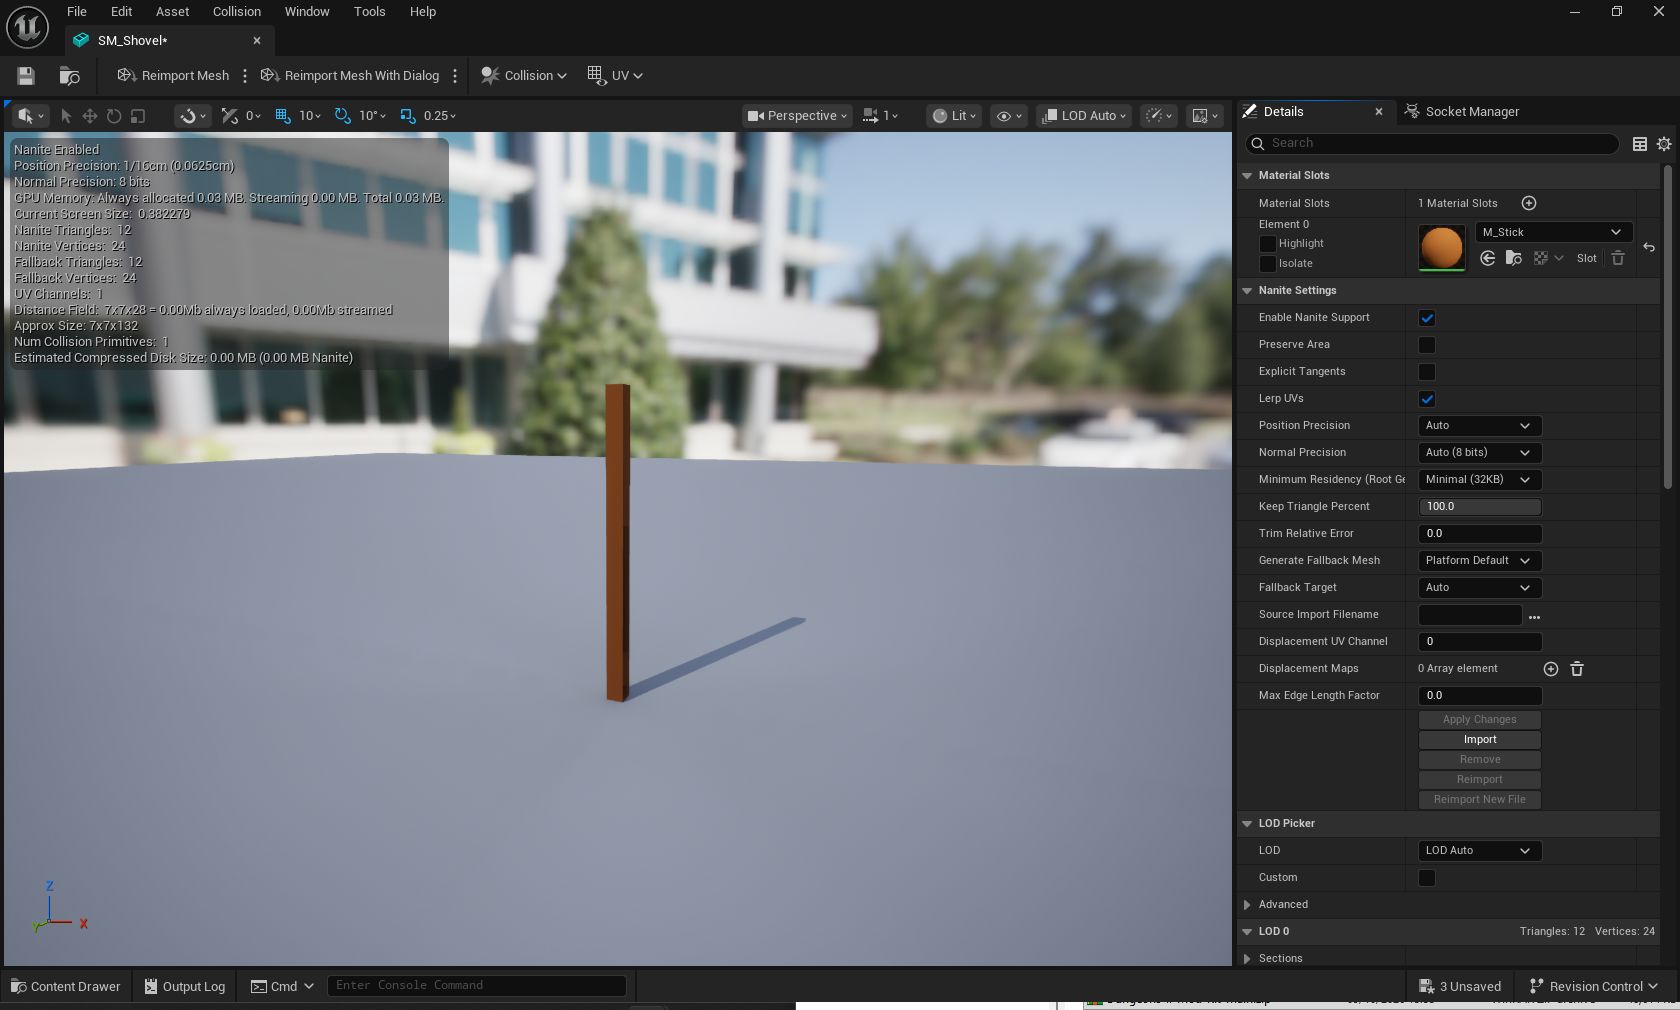
SM_Shovel, and Material Slot 0 contains M_Stick.Assign the correct equipped material
- In Unreal's Content Browser, right-click
M_Stickand choose Create Material Instance. - Name this temporary cooking placeholder exactly
MI_Shovel. - Open
SM_Shovelin the Static Mesh Editor. - Change Material Slot 0 from
M_SticktoMI_Shovel. - Click the Save icon in the Static Mesh Editor, return to the main Unreal window, and click Save All. Do this before closing Unreal or running
Dungeons-II-Mod-Kit-main\cook_assets.bat. - Do not assign
MI_Shovel_Storableto the mesh. It contains the movement used by the inventory presentation and makes an equipped replacement move separately from the hand. - Do not remove
MI_*.u*fromDungeons-II-Mod-Kit-main\copy_cooked_assets.rcj. Unreal needs the placeholder while cooking, but the placeholder must not enter the final mod. - At the end of
Dungeons-II-Mod-Kit-main\cook_assets.bat, the Mod Kit copies the patchedMI_Shovelpair and the untouchedMI_Shovel_Storablepair fromDungeons-II-Mod-Kit-main\Precookedinto the final staging folder.
Check the imported asset
- The Content Browser must contain
SM_Shovel,M_Stickand the temporaryMI_Shovelcooking placeholder. - Double-click
SM_Shovel. - In the Static Mesh Editor, confirm the stick is visible and Material Slot 0 uses
MI_Shovel. - Check the approximate bounds. This example is about
7.5 cm × 7.5 cm × 132.6 cm. If it is about 100 times too small or too large, correct the Blender/FBX unit settings and re-import. - Do not change the mesh's position in Unreal to repair a bad pivot. Correct the mesh in Blender and export again.
- Click Save, close the Static Mesh Editor, then choose File > Save All.
- Close Unreal Engine before cooking.
Exact asset folder:
/Game/Spicewood/Art/Characters/Player/Equipment/Weapons/Shovel. The replacement mesh must use this virtual folder and the exact name SM_Shovel.8Extract and Patch the Original Materials
Run this step last, immediately before cooking. The model, textures, inventory icon, Unreal material placeholder and all Unreal saves must already be finished. After completing this section, do not reopen Unreal; continue directly to Cook and Package.
Extract both editable materials with the helper
Do not rebuild the final material instances. The equipped mesh and inventory component use different compiled materials. Replacing both with the storable material makes the weapon move independently of the character's hand.
Do not use FModel's Raw Data export for this step. FModel exports one Zen-format
.uasset for each material and no .uexp. That is normal, but UAssetGUI rejects it with File signature mismatch. reTOC must convert the materials to the editable legacy format first.- Close Minecraft Dungeons II.
- Download
extract_dungeons2_assets.batand downloadretoc.exefrom the reTOC release linked above. - Double-click
extract_dungeons2_assets.bat. - For
retoc.exe, paste its full path into the path box or click Browse... and select it, then click Continue. - For the game's
Paksfolder, paste the full folder path or click Browse.... This must be the folder containingDungeons-WinGDK.utocandglobal.utoc. - Return to FModel and locate
MI_Shovelin the normal Shovel package folder. - Right-click
MI_Shovel, choose Copy > Package Path, and return to the extractor. - Paste the copied package path into the extractor's asset-path filter box. For this tutorial, you can shorten the pasted value to
Shovel/MI_Shovel; that matches bothMI_ShovelandMI_Shovel_Storable. - Paste the correct version-specific AES key into the visible input box. Check that the complete key was pasted, then click Continue. The extractor does not print or save the key.
- For this tutorial, use this exact output folder:
Dungeons-II-Mod-Kit-main\Precooked\Dungeons\Content\Spicewood\Art\Characters\Player\Equipment\Weapons\Shovel
Paste its full path from your computer into the output box. The extractor creates missing folders. - Review the filter and output folder, press Y, and wait for SUCCESS.
- Open
Dungeons-II-Mod-Kit-main\Precooked\Dungeons\Content\Spicewood\Art\Characters\Player\Equipment\Weapons\Shovel. Confirm it containsMI_Shovel.uasset,MI_Shovel.uexp,MI_Shovel_Storable.uassetandMI_Shovel_Storable.uexp.
What the extractor does: it runs the selected reTOC executable for Unreal Engine
5.6, disables shader extraction, and converts only packages matching the filter you entered. It does not contain a fixed weapon name, AES key, game location or output location.Adjust the original Shovel material brightness with UAssetGUI
- Keep
MI_Shovel.uassetandMI_Shovel.uexptogether inDungeons-II-Mod-Kit-main\Precooked\Dungeons\Content\Spicewood\Art\Characters\Player\Equipment\Weapons\Shovel. UAssetGUI needs both files. - Open UAssetGUI without opening the asset yet.
- Choose Utils > Import Mappings... and select the same matching Dungeons II
.usmapfile used by FModel. If you are using game version1.1.1and do not have it, download the version 1.1.1 mapping here. If asked for a name, enterDungeons II 1.1.1. - At the top-right of UAssetGUI, change No mappings to the imported Dungeons II mappings and set the engine version to
5.6. - Now choose File > Open and select
MI_Shovel.uasset. - If you already opened the asset and saw Failed to parse unversioned properties or Failed to parse 1 export, import and select the mappings as described above, then close and reopen
MI_Shovel.uasset. - Look at the tree in the left panel. Click the small + beside Export Data. Do not click Export Information.
- Under Export Data, expand
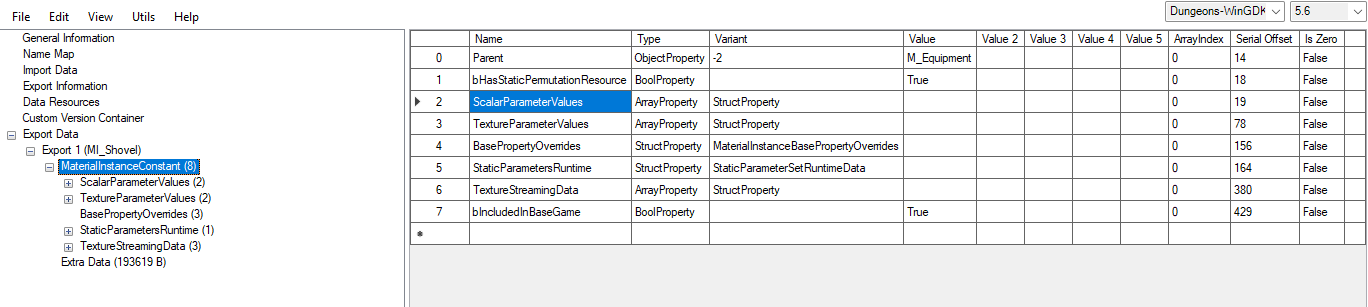
Export 1 (MI_Shovel), then expandMaterialInstanceConstant (8). - You should now see
ScalarParameterValues (2), as shown below. This confirms you are in the correct place.
- Click the small + beside
ScalarParameterValues (2)in the left tree. Two numbered parameter entries appear underneath it.

ScalarParameterValues (2), entries 0 (3) and 1 (3) appear. Each has its own ParameterInfo (3).- Click
ParameterInfo (3)under entry0 (3)and read the Name value in the right panel. Repeat under entry1 (3). Stop when the Name isnaturalEmissiveBrightness. In the example below, it is entry1 (3).
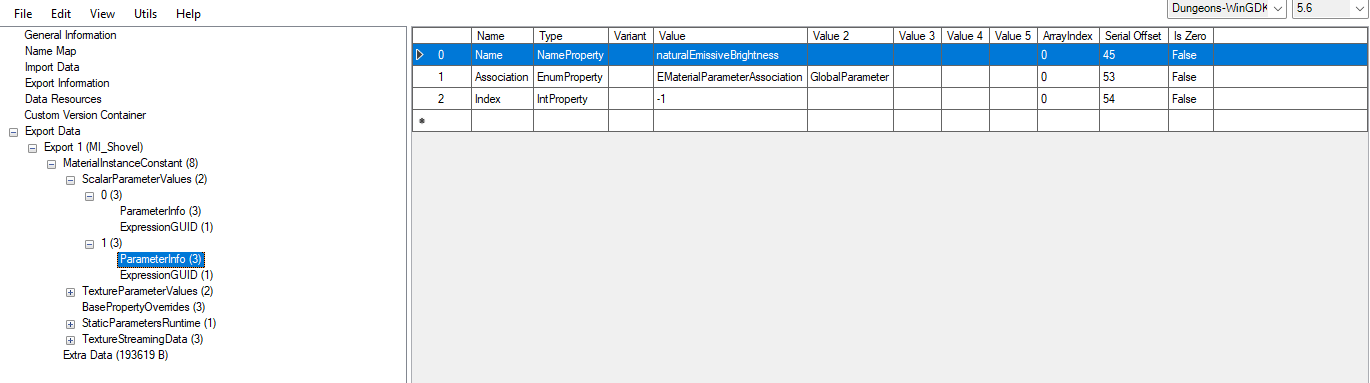
naturalEmissiveBrightness.- Click the numbered parent entry that contains that name. In this example, click
1 (3). In the right panel, find itsParameterValuerow, double-click the current value0.25, type1.0, and pressEnter. Do not change the other numbered entry.
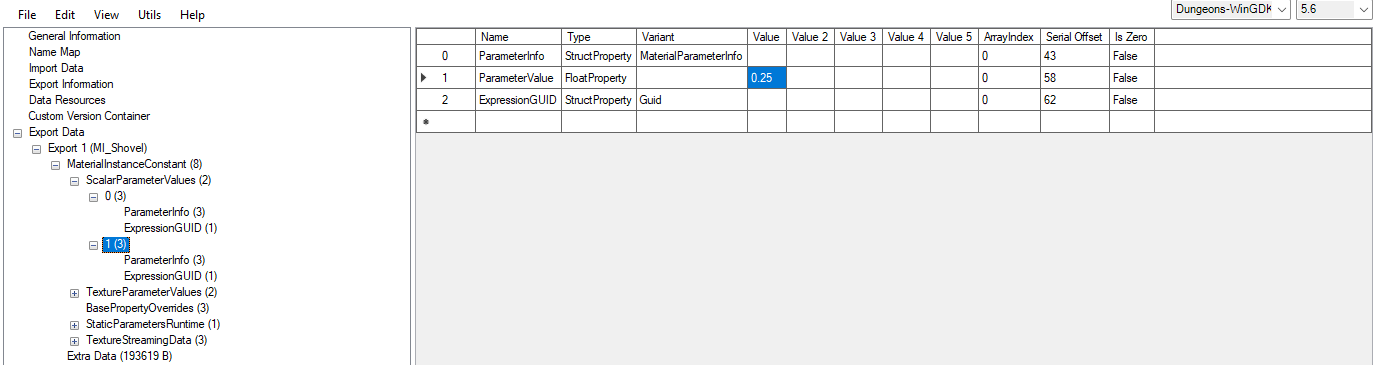
0.25 cell on the ParameterValue row and replace it with 1.0.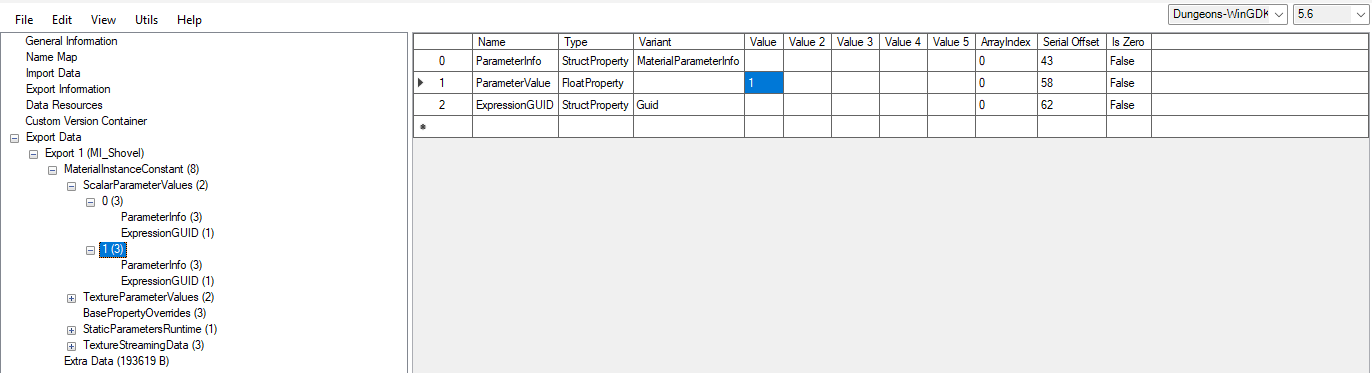
1.0 as 1; this is correct. Press Enter, then save the asset.- Choose File > Save. Confirm the updated
MI_Shovel.uassetandMI_Shovel.uexpremain in thePrecookedShovel folder beside the unchangedMI_Shovel_Storablepair. - Delete
MI_Shovel.uasset.bakandMI_Shovel.uexp.bakfrom thePrecookedShovel folder before cooking. They are UAssetGUI backups and must not remain in the mod's input folder. If you want to keep them, move them somewhere outsideDungeons-II-Mod-Kit-main.
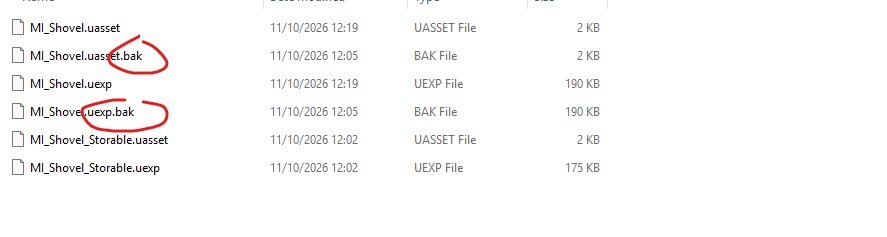
.bak files when it saves. Delete them from the Precooked Shovel folder before cooking.- After deleting the backups, the
PrecookedShovel folder must contain these four material files and no.bakfiles:MI_Shovel.uasset,MI_Shovel.uexp,MI_Shovel_Storable.uassetandMI_Shovel_Storable.uexp.
Why this edit is needed: the game's normal Shovel material multiplies its base colour by
naturalEmissiveBrightness. Raising only this value to 1.0 keeps the brown texture visible on the equipped weapon without adding a glow.9Cook and Package
- Keep Minecraft Dungeons II closed.
- Double-click
Dungeons-II-Mod-Kit-main\cook_assets.bat. - Wait for Unreal's command window to finish. A successful cook reports zero errors. On the first cook it should report that three textures were imported.
- Before packaging, open
Dungeons-II-Mod-Kit-main\Dungeons\Dungeons\Content\Spicewood\Art\Characters\Player\Equipment\Weapons\Shovel. Confirm it contains cooked files forSM_Shovel,M_Stick,T_Shovel,T_Shovel_MRESandT_UI_Shovel_Icon. - Confirm it also contains the patched
MI_Shovel.uasset/.uexppair and the untouchedMI_Shovel_Storable.uasset/.uexppair copied fromDungeons-II-Mod-Kit-main\Precooked. - If the final message says the
Precookedsource folder is missing, createDungeons-II-Mod-Kit-main\Precooked\Dungeons\Content\Spicewood\Art\Characters\Player\Equipment\Weapons\Shovel, add both complete material pairs, and runDungeons-II-Mod-Kit-main\cook_assets.batagain. - Double-click
Dungeons-II-Mod-Kit-main\package.bat. - Do not run a separate reTOC packaging command here.
Dungeons-II-Mod-Kit-main\package.batcalls the Mod Kit's internal reTOC tool with the correctto-zenarguments. - Open the game's
Paks\~modsfolder. Inside the folder named after your mod id, confirm all three files exist:
Stick-Shovel-Tutorial_P.pakStick-Shovel-Tutorial_P.ucasStick-Shovel-Tutorial_P.utoc
All three files are required. A lone
.pak is not a complete Dungeons II mod package.10Load the Game, Equip and Test
- Launch Minecraft Dungeons II from the store or launcher where you installed it. Do not start the shipping executable directly.
- At the title screen, select the hero that owns a normal Shovel, then choose Start Game to load into camp.
- Open the inventory. With a controller, the default quick-inventory control is D-pad Up. With keyboard and mouse, use the inventory control shown by the game; if it has been remapped, check Settings > Controls.
- Confirm the weapon tile shows the new brown-stick icon instead of the original metal Shovel icon.
- Move to the melee weapon slot and open the list of owned melee weapons.
- Select a normal Shovel and use the on-screen Equip control. The exact confirm button follows the controller or keyboard prompts shown by the game.
- Open the full inventory preview and rotate/view the equipped Shovel. It should now appear as the brown stick.
- Return to camp and confirm the character holds the lower end of the stick.
- Walk, roll and perform every normal Shovel attack. Check that the model remains attached throughout the full combo.
- Check both the inventory model and the in-game model. They use different presentation scenes, so inspect both.
- When testing is finished, close the game before replacing, rebuilding or deleting mod files.
No Shovel in the inventory? The mod replaces the model; it does not grant the item. Obtain a normal Shovel in the game first, then equip that item to see the replacement.
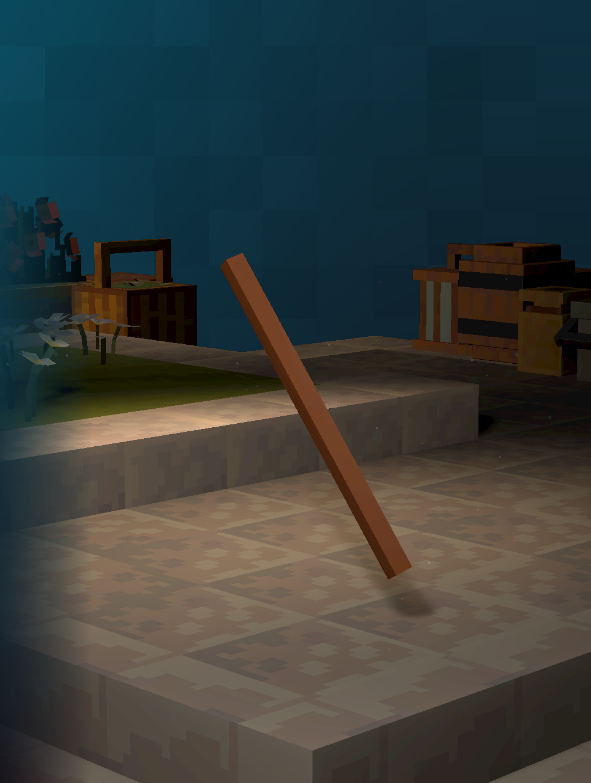
Fix Common Problems
| The Shovel did not change | Check the exact Unreal folder and asset name. It must be /Game/Spicewood/Art/Characters/Player/Equipment/Weapons/Shovel/SM_Shovel. Confirm the three packaged files are inside Paks\~mods\your-mod-id. |
|---|---|
| FModel cannot load archives | Confirm the Paks folder, GAME_UE5_6, the matching .usmap, and the correct version-specific AES key. Do not place the key in a public guide or mod. |
| PSK is missing in Blender | Install/enable the Unreal PSK/PSA extension and restart Blender. |
| The stick floats | The object origin moved. Rebuild the cube at the imported Shovel origin and move vertices only in Edit Mode. Object Location must remain 0, 0, 0. |
| The stick moves but the hand stays still | Material Slot 0 is using MI_Shovel_Storable. Assign MI_Shovel to the mesh and leave MI_Shovel_Storable only for the game's inventory component, then cook and package again. |
| The stick points sideways | Compare it against the imported Shovel reference. Do not guess the forward direction. Keep FBX at -Y Forward and Z Up. |
| The stick is tiny or enormous | Use FBX scale 1.0, Apply Unit on, and Unreal Convert Scene Unit on. Re-import and check for roughly 132.6 cm length. |
FModel exported only .uasset files | That is FModel's Zen-format Raw Data export and it cannot be edited by UAssetGUI. Use the reTOC material-extraction steps above. A successful extraction creates both .uasset and .uexp for each material. |
| The stick is grey, black or different between views | Confirm both replacement textures were cooked. Material Slot 0 must use MI_Shovel. Patch only its naturalEmissiveBrightness value to 1.0, keep MI_Shovel_Storable unchanged, and place both complete material pairs in Dungeons-II-Mod-Kit-main\Precooked\Dungeons\Content\Spicewood\Art\Characters\Player\Equipment\Weapons\Shovel. |
| The inventory still shows the original Shovel icon | Confirm the PNG is named T_UI_Shovel_Icon.png and is inside Dungeons-II-Mod-Kit-main\Textures\Spicewood\Art\Characters\Player\Equipment\Weapons\Shovel. Cook again and check that cooked T_UI_Shovel_Icon files appear under Dungeons-II-Mod-Kit-main\Dungeons. |
| Cooking reports a missing Precooked folder | Create Dungeons-II-Mod-Kit-main\Precooked\Dungeons\Content\Spicewood\Art\Characters\Player\Equipment\Weapons\Shovel, add both complete MI_Shovel and MI_Shovel_Storable pairs, then run Dungeons-II-Mod-Kit-main\cook_assets.bat again. |
| The game crashes | Close the game, remove only this tutorial mod's folder from ~mods, then test without it. Recheck the engine version, asset path and packaged files before trying again. |
Finished: when a normal Shovel has the brown-stick icon, appears brown in both inventory previews and gameplay, and remains correctly attached through every attack, the first custom weapon replacement is complete.